

How To use RFID Reader/Writer Module ?
- Jul 25, 2016
- 5 min read
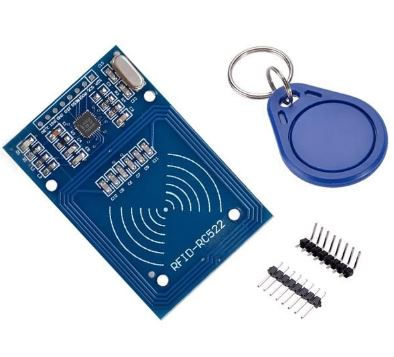
Description RFID Module -
A radio frequency identification reader (RFID reader) is a device used to gather information from an RFID tag, which is used to track individual objects. Radio waves are used to transfer data from the tag to a reader. RFID is a technology similar in theory to bar codes. However, the RFID tag does not have to be scanned directly, nor does it require line-of-sight to a reader. The RFID tag it must be within the range of an RFID reader, which ranges from 3 to 300 feet, in order to be read. RFID technology allows several items to be quickly scanned and enables fast identification of a particular product, even when it is surrounded by several other items.
RFID technology may be used in a variety of applications including:
Passports
Smart cards
Airplane luggage
Toll booth passes
Home appliances
Buying Option -
Features: • Current :13-26mA / DC 3.3V, Idle Current :10-13mA / DC 3.3V, Sleep current: <80uA, Peak current: <30mA
• Operating Frequency: 13.56MHz
• Supported card types: mifare1 S50, mifare1 S70, mifare UltraLight, mifare Pro, mifare Desfire • Physical Characteristics: Dimensions: 40mm × 60mm
• Module Interface SPI Parameters
• Data Transfer Rate: Max. 10Mbit/s
Circuit Diagram

Arduino Library
There are cheap RFID modules that can read and write Mifare's tags and being sold at several web stores like eBay and includedwith many "starter kits" nowadays. Simply search RFIDRC522 (MF-RC522). The microcontroller and card reader uses SPIfor communication (chip supports I2C and UART protocols but notimplemented on library) (Maybe someone implements?). Thecard reader and the tags communicate using a 13.56MHzelectromagnetic field. (ISO 14443A standard tags).
Download MFRC522 Library:
For Additional information checkout below link:
Sample program 1
/* * -------------------------------------------------------------------------------------------------------------------- * Example sketch/program showing how to read data from a PICC to serial. * -------------------------------------------------------------------------------------------------------------------- * This is a MFRC522 library example; for further details and other examples see: https://github.com/miguelbalboa/rfid * * Example sketch/program showing how to read data from a PICC (that is: a RFID Tag or Card) using a MFRC522 based RFID * Reader on the Arduino SPI interface. * * When the Arduino and the MFRC522 module are connected (see the pin layout below), load this sketch into Arduino IDE * then verify/compile and upload it. To see the output: use Tools, Serial Monitor of the IDE (hit Ctrl+Shft+M). When * you present a PICC (that is: a RFID Tag or Card) at reading distance of the MFRC522 Reader/PCD, the serial output * will show the ID/UID, type and any data blocks it can read. Note: you may see "Timeout in communication" messages * when removing the PICC from reading distance too early. * * If your reader supports it, this sketch/program will read all the PICCs presented (that is: multiple tag reading). * So if you stack two or more PICCs on top of each other and present them to the reader, it will first output all * details of the first and then the next PICC. Note that this may take some time as all data blocks are dumped, so * keep the PICCs at reading distance until complete. * * @license Released into the public domain. * * Typical pin layout used: * ----------------------------------------------------------------------------------------- * MFRC522 Arduino Arduino Arduino Arduino Arduino * Reader/PCD Uno Mega Nano v3 Leonardo/Micro Pro Micro * Signal Pin Pin Pin Pin Pin Pin * ----------------------------------------------------------------------------------------- * RST/Reset RST 9 5 D9 RESET/ICSP-5 RST * SPI SS SDA(SS) 10 53 D10 10 10 * SPI MOSI MOSI 11 / ICSP-4 51 D11 ICSP-4 16 * SPI MISO MISO 12 / ICSP-1 50 D12 ICSP-1 14 * SPI SCK SCK 13 / ICSP-3 52 D13 ICSP-3 15 */
#define RST_PIN 9 // Configurable, see typical pin layout above #define SS_PIN 10 // Configurable, see typical pin layout above
MFRC522 mfrc522(SS_PIN, RST_PIN); // Create MFRC522 instance
/** * mfrc522.PICC_IsNewCardPresent() should be checked before * @return the card UID */ unsigned long getID(){ if ( ! mfrc522.PICC_ReadCardSerial()) { //Since a PICC placed get Serial and continue return -1; } unsigned long hex_num; hex_num = mfrc522.uid.uidByte[0] << 24; hex_num += mfrc522.uid.uidByte[1] << 16; hex_num += mfrc522.uid.uidByte[2] << 8; hex_num += mfrc522.uid.uidByte[3]; mfrc522.PICC_HaltA(); // Stop reading return hex_num; }
void setup() { Serial.begin(9600); // Initialize serial communications with the PC while (!Serial); // Do nothing if no serial port is opened (added for Arduinos based on ATMEGA32U4) SPI.begin(); // Init SPI bus mfrc522.PCD_Init(); // Init MFRC522 mfrc522.PCD_DumpVersionToSerial(); // Show details of PCD - MFRC522 Card Reader details Serial.println(F("Scan PICC to see UID, SAK, type, and data blocks...")); }
void loop() { if(mfrc522.PICC_IsNewCardPresent()) { unsigned long uid = getID(); if(uid != -1){ Serial.print("Card detected, UID: "); Serial.println(uid); if(uid == 24709) //change the compare value to the desired RFID card value. { Serial.println("Data Matched"); } } } }
Sample Program 2
/* * -------------------------------------------------------------------------------------------------------------------- * Example sketch/program showing how to read data from a PICC to serial. * -------------------------------------------------------------------------------------------------------------------- * This is a MFRC522 library example; for further details and other examples see: https://github.com/miguelbalboa/rfid * * Example sketch/program showing how to read data from a PICC (that is: a RFID Tag or Card) using a MFRC522 based RFID * Reader on the Arduino SPI interface. * * When the Arduino and the MFRC522 module are connected (see the pin layout below), load this sketch into Arduino IDE * then verify/compile and upload it. To see the output: use Tools, Serial Monitor of the IDE (hit Ctrl+Shft+M). When * you present a PICC (that is: a RFID Tag or Card) at reading distance of the MFRC522 Reader/PCD, the serial output * will show the ID/UID, type and any data blocks it can read. Note: you may see "Timeout in communication" messages * when removing the PICC from reading distance too early. * * If your reader supports it, this sketch/program will read all the PICCs presented (that is: multiple tag reading). * So if you stack two or more PICCs on top of each other and present them to the reader, it will first output all * details of the first and then the next PICC. Note that this may take some time as all data blocks are dumped, so * keep the PICCs at reading distance until complete. * * @license Released into the public domain. * * Typical pin layout used: * ----------------------------------------------------------------------------------------- * MFRC522 Arduino Arduino Arduino Arduino Arduino * Reader/PCD Uno Mega Nano v3 Leonardo/Micro Pro Micro * Signal Pin Pin Pin Pin Pin Pin * ----------------------------------------------------------------------------------------- * RST/Reset RST 9 5 D9 RESET/ICSP-5 RST * SPI SS SDA(SS) 10 53 D10 10 10 * SPI MOSI MOSI 11 / ICSP-4 51 D11 ICSP-4 16 * SPI MISO MISO 12 / ICSP-1 50 D12 ICSP-1 14 * SPI SCK SCK 13 / ICSP-3 52 D13 ICSP-3 15 */
#define RST_PIN 9 // Configurable, see typical pin layout above #define SS_PIN 10 // Configurable, see typical pin layout above
MFRC522 mfrc522(SS_PIN, RST_PIN); // Create MFRC522 instance
/** * mfrc522.PICC_IsNewCardPresent() should be checked before * @return the card UID */ unsigned long getID(){ if ( ! mfrc522.PICC_ReadCardSerial()) { //Since a PICC placed get Serial and continue return -1; } unsigned long hex_num; hex_num = mfrc522.uid.uidByte[0] << 24; hex_num += mfrc522.uid.uidByte[1] << 16; hex_num += mfrc522.uid.uidByte[2] << 8; hex_num += mfrc522.uid.uidByte[3]; mfrc522.PICC_HaltA(); // Stop reading return hex_num; }
void setup() { Serial.begin(9600); // Initialize serial communications with the PC while (!Serial); // Do nothing if no serial port is opened (added for Arduinos based on ATMEGA32U4) SPI.begin(); // Init SPI bus mfrc522.PCD_Init(); // Init MFRC522 mfrc522.PCD_DumpVersionToSerial(); // Show details of PCD - MFRC522 Card Reader details Serial.println(F("Scan PICC to see UID, SAK, type, and data blocks...")); }
void loop() { if(mfrc522.PICC_IsNewCardPresent()) { unsigned long uid = getID(); if(uid != -1){ Serial.print("Card detected, UID: "); Serial.println(uid); } } }
Comments